ESP8266 and friends
2018-10-24
This page:
MicroPython for the ESP8266
- 2016-04-12, Acrobotic, YouTube: ESP8266 Running Python Using MicroPython (Mac and Windows)
Nodemcu
A board with ‘HelloServer’
A usb connection is sufficient to power this board up and it appears in my wlan network. Obviously I once uploaded the following sketch to the board:
#include <ESP8266WiFi.h>
#include <WiFiClient.h>
#include <ESP8266WebServer.h>
#include <ESP8266mDNS.h>

const char* ssid = "MyWlan";
const char* password = "MyWlanPassword";

ESP8266WebServer server(80);

const int led = 13;

void handleRoot() {
  digitalWrite(led, 1);
  server.send(200, "text/plain", "hello from esp8266!");
  digitalWrite(led, 0);
}

void handleNotFound(){
  digitalWrite(led, 1);
  String message = "File Not Found\n\n";
  message += "URI: ";
  message += server.uri();
  message += "\nMethod: ";
  message += (server.method() == HTTP_GET)?"GET":"POST";
  message += "\nArguments: ";
  message += server.args();
  message += "\n";
  for (uint8_t i=0; i<server.args(); i++){
    message += " " + server.argName(i) + ": " + server.arg(i) + "\n";
  }
  server.send(404, "text/plain", message);
  digitalWrite(led, 0);
}

void setup(void){
  pinMode(led, OUTPUT);
  digitalWrite(led, 0);
  Serial.begin(115200);
  WiFi.begin(ssid, password);
  Serial.println("");

  // Wait for connection
  while (WiFi.status() != WL_CONNECTED) {
    delay(500);
    Serial.print(".");
  }
  Serial.println("");
  Serial.print("Connected to ");
  Serial.println(ssid);
  Serial.print("IP address: ");
  Serial.println(WiFi.localIP());

  if (MDNS.begin("esp8266")) {
    Serial.println("MDNS responder started");
  }

  server.on("/", handleRoot);

  server.on("/inline", [](){
    server.send(200, "text/plain", "this works as well");
  });

  server.onNotFound(handleNotFound);

  server.begin();
  Serial.println("HTTP server started");
}

void loop(void){
  server.handleClient();
}
But how did I do the upload?
My old computer
Ubuntu 14.04 Trusty Tahr, Arduino IDE v1.0.5
The Arduino IDE is really old and I can’t remember how I selected the Nodemcu board. However the serial monitor on the old machine works and shows:
.......
Connected to MyWlan
IP address: 192.168.1.210
MDNS responder started
HTTP server started
My new computer
Ubuntu 18.04 Bionic Beaver, newest Arduino IDE v1.8.5
I connect the board via micro usb cable to my computer. Unbelievable: Only half of my micro usb cables do work at all. I consider those “working” which create a /dev/ttyUSB0 device. With the other cables Ubuntu linux doesn’t even create a device when plugging. You can start ‘minicom’ to easily test which are working. If you open minicom and connect to ttyUSB0 it will not stop when device ttyUSB0 goes away. Instead, it just tells about the status.
So we continue with one of those working cables. Linux creates device /dev/ttyUSB0 and we select that in the Arduino IDE.
Problem: The Arduino IDE cannot open port /dev/ttyUSB0:
warning: espcomm_sync failed
error: espcomm_open failed
Many people seem to have this problem - see https://github.com/esp8266/Arduino/issues/770
Must read: Here’s a trouble shooting guide (!) for that problem: sparkfun - Comments: ESP8266 Thing Hookup Guide
And, the serial monitor doesn’t work.
On the other hand: When I use ‘minicom’ as serail monitor I can see exactly the same output I have on my old machine:
.......
Connected to MyWlan
IP address: 192.168.1.210
MDNS responder started
HTTP server started
So my situation is:
- Solved: Use a verified micro usb cable to have Linux create /dev/ttyUSB0 on plugging
- Solved: I can receive and display serial output from the Nodemcu by using ‘minicom’ as terminal program
- Still a problem: The Arduino IDE cannot talk to /dev/ttyUSB0
- Still a problem: The serial monitor of the Arduino IDE cannot connect to /dev/ttyUSB0 (while minicom can)
- Still a problem: I do not get a reaction from a brand new Nodemcu on /dev/ttyUSB0 when trying with minicom
Update: Check this wonderful documentation https://github.com/esp8266/Arduino/blob/master/doc/faq/a01-espcomm_sync-failed.rst ESPEasy =======
001
How to get the ESPEasy firmware:
- Download a ZIP file (!) from releases. Zip already contain the complete images we need for flashing. If you just clone the repositories you would have to build those images yourself: https://github.com/letscontrolit/ESPEasy/releases
002
Ubuntu 18.04 Bionic Beaver:
➜  Apps: pip --version
pip 18.1 from /home/marble/.local/lib/python3.6/site-packages/pip (python 3.6)

pip install --upgrade esptool --user
esptool.py -h
003
Ha, this works: https://nodemcu.readthedocs.io/en/master/en/flash/#sdk-init-data
erase_flash:
(python36-kLdIL1Ub) ➜  dist git:(mega)  esptool.py --port /dev/ttyUSB0 erase_flash

esptool.py v2.5.1
Serial port /dev/ttyUSB0
Connecting....
Detecting chip type... ESP8266
Chip is ESP8266EX
Features: WiFi
MAC: cf:5c:ac:7f:c6:75
Uploading stub...
Running stub...
Stub running...
Erasing flash (this may take a while)...
Chip erase completed successfully in 12.9s
Hard resetting via RTS pin...

(python36-kLdIL1Ub) ➜  dist git:(mega)
flashing:
(python36-kLdIL1Ub) ➜  ESPEasy_mega-20181021 esptool.py --port /dev/ttyUSB0 write_flash -fm dio 0x00000 ESP_Easy_mega-20181021_normal_ESP8266_4096.bin
esptool.py v2.5.1
Serial port /dev/ttyUSB0
Connecting....
Detecting chip type... ESP8266
Chip is ESP8266EX
Features: WiFi
MAC: cf:5c:ac:7f:c6:75
Uploading stub...
Running stub...
Stub running...
Configuring flash size...
Auto-detected Flash size: 4MB
Compressed 763888 bytes to 495339...
Wrote 763888 bytes (495339 compressed) at 0x00000000 in 43.9 seconds (effective 139.4 kbit/s)...
Hash of data verified.

Leaving...
Hard resetting via RTS pin...
(python36-kLdIL1Ub) ➜  ESPEasy_mega-20181021
Links
- 2017-05-04, Mert Arduino and Tech, YouTube: How to Make ESP8266 WiFi Robot Car, controlled with Application
- 2017-01-12, (de) Frank: (de) NodeMCU und ESP8266 – Einstieg in die Programmierung
- 2016-10-22, René Bohne, YouTube: (de) ESP8266 nodemcu mit der Arduino IDE programmieren
Tools
Ubuntu 18.04 LTS Bionic Beaver
Use minicom as terminal to connect to the serial port ttyUSB0. Advantage: The terminal windows immediately shows what’s going on while you plug and unplug the usb device.
- sudo apt install minicom
- minicom man page
Recherche
2016-07-02, OpenDataLab(de), schön bebildert: Einrichtung der Arduino IDE mit dem NodeMCU/ESP8266 Board
2015-06-09, Embedded Systems Laboratory, solving an upload problem: ESP8266 Arduino IDE on Mac OS X Yosemite 10.10.3
with pointers to:
Tutorials
YouTube
- 2018-05-21, Vicious Computers, YouTube: Fastest way to Flash and Configure ESP8266 Based Sonoff Devices with Tasmota or other firmware
- 2017-05-04, IT Chop Shop, YouTube: Easy way to program an ESP8266
- 2016-11-28, Brainy-Bits, YouTube: Program NODEMCU Dev Kit using the Arduino IDE - WiFi Web LED’s WS2812 – Introduction Tutorial
- 2016-11-12, ! Acrobotic, YouTube: ESP8266 Web Server Step-By-Step Using Arduino IDE (Mac and Windows)
Articles
- Maker pro: ESP8266 Tutorials
See also
Kjeld Schmidt: ESP 20Attempts @ github
This sketch starts a local wifi server, which serves a web page with two buttons These buttons can be used to pull a pin high or low, controlling, for example, an LED
Oh these micro usb cables
Some work, some don’t. Why? I don’t know. The only way to find out whether a cable works is to do a test.
For a test I’m starting minicom –device /dev/ttyUSB0 on Ubuntu. It opens a terminal window that complains that /dev/ttyUSB0 isn’t available. When I now connect a device with a working cable the complaint vanishes. When I unplug or use a bad cable the complaint appears again.
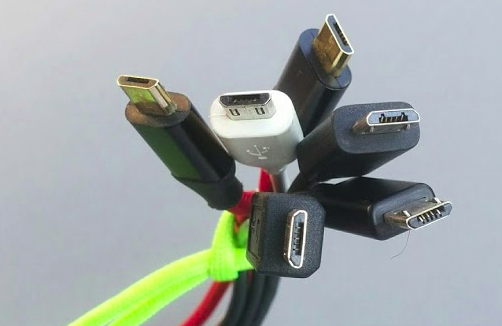
In my case these work:
And these do not work:
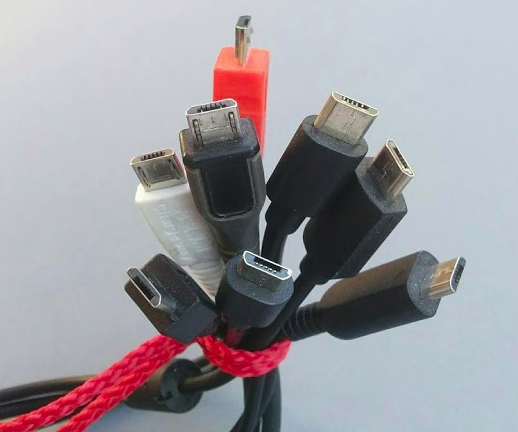
Can you see the difference? I can’t.
To be sorted
http://arduino.esp8266.com/stable/package_esp8266com_index.json
https://github.com/arduino/Arduino/wiki/Unofficial-list-of-3rd-party-boards-support-urls
https://randomnerdtutorials.com/how-to-install-esp8266-board-arduino-ide/
This is history https://github.com/nodemcu/nodemcu-devkit https://github.com/nodemcu/nodemcu-devkit/tree/master/Drivers
New boards https://github.com/nodemcu/nodemcu-devkit-v1.0 !!!
Das richtige Kabel verwenden!
https://canox.net/2017/07/ubuntu-zugriff-auf-devttyusb0-verweigert/
sudo usermod -a -G dialout $USER
https://www.instructables.com/id/Get-Started-with-ESP8266-Using-AT-Commands-NodeMCU/
https://www.heise.de/ct/artikel/ESPEasy-installieren-4076214.html
https://www.mikrocontroller-elektronik.de/nodemcu-esp8266-tutorial-wlan-board-arduino-ide/
![]()
Quick search
Enter search terms.
Tags
- Ablog
- Ansible
- Arduino
- Bash
- CSS
- Computing
- Database
- Docker
- Editor
- Extbase
- Family
- Flask
- Fluid
- General
- Git
- Graphics
- Gui
- Hardware
- Howto
- JQuery
- Javascript
- Kochen
- Linux
- Lisp
- Psychology
- Python
- QandA
- ReST
- Recreation
- Ruby
- Sailing
- Security
- Sphinx
- T3Docs
- TYPO3
- Typography
- Ubuntu
- VPN
- Vagrant
- WebDev
- Webdesign
Archives
Languages
Recent Posts
- Sep 16, 2016:
Take Huge And Giant Screenshots - Sep 08, 2016:
Investigate Disk Usage With 'ncdu' - Jan 09, 2016:
Upgrade to Python 2.7.11 on Ubuntu 14.04 LTS - Dec 18, 2015:
Upgrade TYPO3 from 4.5 to 6.2 - Nov 09, 2015:
TYPO3 Usergroup Meeting in Münster